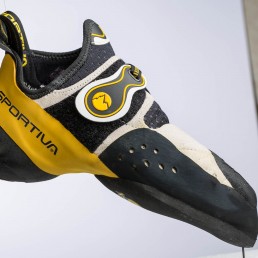
Here’s a behind-the-scenes look at how I created images for La Sportiva’s venerable bouldering shoe, the Solution.
This particular climbing shoe is a high-performance bouldering shoe designed with a sharp downturned toe box for high performance on steep and overhanging terrain. Bouldering is a form of rock climbing that doesn’t use ropes. Climbers often find themselves on steep overhanging rock faces with tiny foot holds. The sharp edge and downturn design help your feet stay securely positioned on the rock in these situations. I wanted to accentuate this feature and decided to shoot the shoe at the downward angle it is normally used at.
First, I needed to stuff the shoe very tightly with cloth so that the shape of the rubber and leather looked full. Performance climbing shoes are typically designed to stretch on your foot tightly, with no gaps anywhere. This means that a shoe without a foot in it looks slightly deflated and does not hold its shape. The cloth helped fill in the toe and tongue area, but the ankle opening was still buckling inward. I fixed this by taking a metal strap pipe clamp and fitting it in the shoe opening.
To keep the shoe at this angle, and to get the shoe off of the background so I could get a clean profile edge with no shadow, I had to hang it. To do this, I used an open safety-pin inside the heel. You know how a safety-pin makes a V-shape when it’s open? On one side is the sharp pin, on the side is the clasp that holds the pin. I stuck the pin head slightly into the inside back edge of the heel cup, and then tied fishing line to the clasp end. Heel..V..fishing line. I was then able to lift the back of the shoe up by the fishing line, with the pin head stuck in the inside of the heel. Make sense? Sorry, I wish I had taken a photo of the inside of the shoe rigged up.
To get the toe off the background, I used a styrofoam block underneath the whole shoe, and then stuck a piece of wire into the styrofoam with the end of the wire protruding about an inch above. I then rested the toe of the shoe on this piece of wire. Done. Shoe suspended in mid-air.
Lighting for most of the images was done with a Paul C Buff (PCB) white 22″ beauty dish (BD) over the shoe at about 2 o’clock, with a PCB Einstein. I also had the diffuser on the BD. I had a partially closed shoot-through umbrella directly left of the shoe at about 9 o’clock providing some fill on the left side. This was the main lighting setup. I also had a small white reflector that I used to paint some light onto the side and bottom edge of the front of the shoe. This helped light up the small oval cutouts in the black rubber. I composited in those fill areas in post. I also had one shot where I took an Einstein with a bare 8.5″ reflector and used it as a hair light to highlight the back of the heel edge. I comped in that edge lighting in post as well.
The lighting was different for the black low-key image than the rest. For this image, I moved the BD more up over the top of the shoe and pulled the light way behind the shoe. This basically made one big hair light and lit up the profile, but keep the front dark. I also put down a black piece of mat board on the white styrofoam to kill some of the fill light from bouncing onto the front of the shoe.
Post processing consisted of some fairly major retouching of the shoe material and shape. The rubber is very soft and sticky. It attracted all kinds of bits of debris over the course of the shoot that had to be removed. I cleaned up the shape lines of the various shoe pieces so that everything had smooth transitions and curves between materials. I also had to clone out the shoe size tag that is glued to the inside ankle surface, and obviously remove the fishing line and wire. You’ll notice in the raw image above, you can see the edge of my white backdrop for that shot. That was no big deal, as I only needed the edge of the shoe on white, not the entire frame. The white leather also had several areas of glue that needed cleaned up. I used the frequency separation method to even out the blotchiness on the black rubber surfaces. After all of that, I was able to drop in the yellow, white, and photo backgrounds for the main shots.
On the low-key black image I did all of the same as above, as well as further darkening the front and bottom of the shoe. I played around with a bunch of versions of this image. I finally settled on darkening the whole underside of the shoe and background basically to flat. The background texture was only slightly visible to allow the hint of the shoe’s bottom profile in the middle to be seen.

